Showing posts with label vfx. Show all posts
25 December, 2019
The Witcher - Yennefer's Eyes
In this video,
As some of you may already know, I am a big fan of the Witcher Franchise and since the release of the TV show on Netflix, there are a ton of cool things to take a look at. One thing that stood out was Yennefer's Eyes.
So I was inspired to try and create a "Yennifer" style VFX Shot, using the Darkfall VFX Nodes Add-on.
You can check out the Witcher Trailer Breakdown here,
After tracking our shot, we can then create the masks that we need. Since the woman in the shot is blinking, we also need to animate the Eyelid mask using the Automatic Keyframes.
You can download the Video here,
I should mention, if you are recording the shot yourself, you might want to add some tracking markers to your actor before shooting your footage. That way, you will have less work to do in the end.
I hope you guys enjoyed this video and as always, thanks for watching!..
02 September, 2019
Eye Color Change Node in Blender 2.8
In this Video, we will be looking at the Eye Color Change Node and how to use it.
If you want to follow along and create these nodes for yourself, we will be creating the Eye Color Change Node Group at the end of the video but if you want to download the Node you can click here, or go to our Custom Node Group Page.
We did this effect a while ago (in 2.79 in fact), and though the process is more or less the same, I wanted to create this Group of Nodes to help optimize my workflow (you can watch that video here).
Instead of having to create the same group of nodes over and over, I can easily append in a single Node Group and save myself a whole bunch of time.
The Eye Color Change Node is (like the others), very simple and you can build upon and improve this how ever you want.
We only need a few masks and a couple of tracks (that is if your subject's eyes move, like in the example).
Then we can append then Eye Col Change Node (...yeah I know, another crappy named node..) and we can play around with not only the color of the Eyes but also the Brightness of the white part of the Eyeball.
I hope this Node group helps you with your current or future projects!.
If you enjoyed this video or at least found it helpful, then be sure to give it a Like!..
As always, thanks for reading.
Labels:
2.8,
b3d,
change,
custom node,
eye,
eye color,
eye color change,
eye colour,
node,
vfx
19 August, 2019
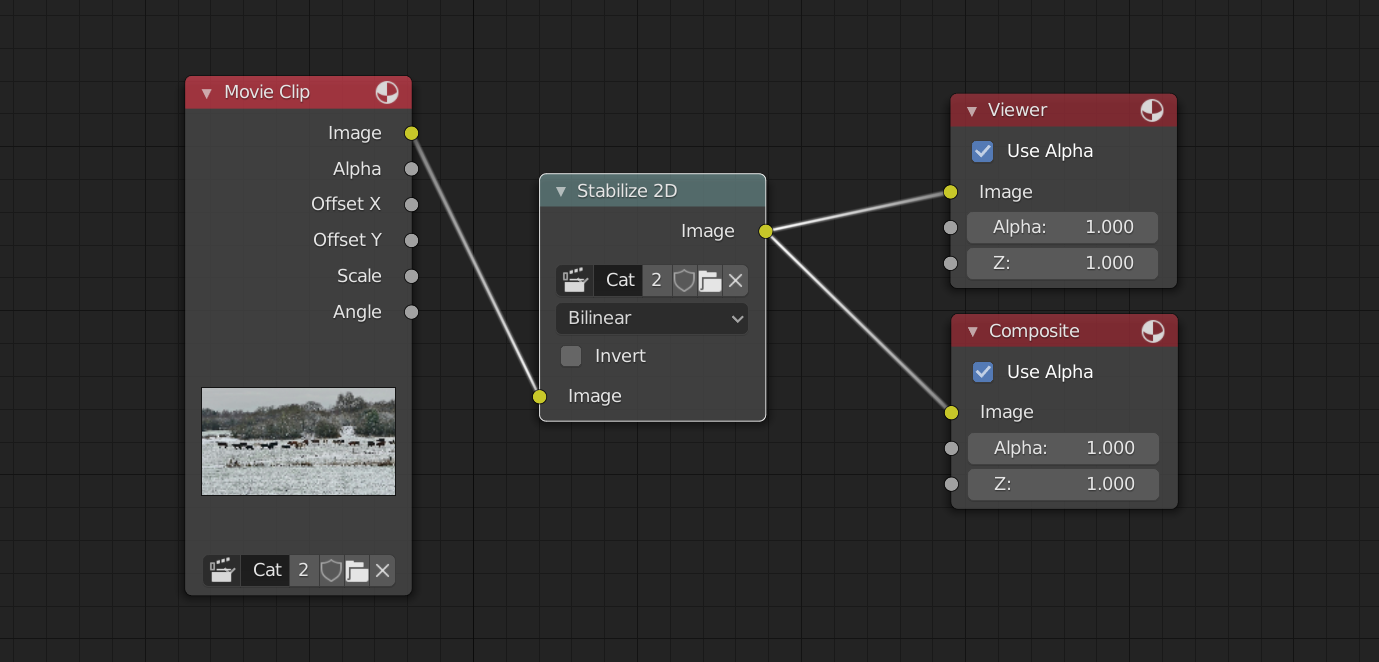
Video Stabilization in Blender 2.8
In this video, we will be fixing our shaky or unstable footage using Blender 2.8 (download 2.8 here). To stabilize our videos, we only need a few tracks and a single node.
If you would like to follow along, you can download the video here.
We will need One Track for the Location (though I like to add a few, just to give Blender more information), and Two Tracks for the Location.
When adding the Location Track(s), it's a good idea to place them in the middle of the video or the "focal point".
I use three Tracks for the Location but you only need one.
When adding the Location Tracks, you want to place one on each side of the screen.
As you can see the Marker on the right is not exactly at the right edge of the screen, like the one on the left but this is fine and Blender has enough information to stabilize the video.
I hope this tutorial helps with your projects and as always, Thanks for reading!.
04 August, 2019
River Rapids in Blender 2.8
In this video, we will be adding some visual interest to our shot with the help of the Niagara Falls, and if you have followed along a previous tutorial you may have already created some "Uber Nodes" or "Mega Nodes".
By using these custom nodes, we can save a whole bunch of time!. I mean who wants to be creating the same group of nodes over and over again? (if you have not made any super nodes, don't worry!. We will composite this shot without them).
This is the original footage we will be starting with (you can download the video here).
It's a nice shot as it is, but I would like to add some more visual interest by adding rapids.
For the "Rapids" we use a Video of the Niagara Falls (download the video here).
Using the Masks we created and a few color nodes we can blend the water asset into the scene.
I wanted to remove the Bridge and though it wasn't really causing a problem, I wanted the Rapids to pull the focus.
Adding your final Color Grade will complete your shot.
Make sure you are optimizing your workflow!..
I have spoke about optimizing your workflow in previous videos, creating the same group of nodes is tedious and if you find yourself doing it over and over, be sure to create and save your custom Nodes!..
Then you can append them into your future projects.
Not only does it save you time but it's also less of an "eyesore".
Have you already created your own custom node groups? let us know in the comment below!.
I hope you guys enjoyed this tutorial and if you create something awesome, be sure to share it with us in our Facebook Group!..
As always thanks for reading!..
28 July, 2019
Flight of the fireflies in Blender 2.8
In this video we will be creating more fireflies. With the help of the Boid Particle system and a bit of tracking we can easily create a surreal fantasy scene.
We have done tracking and have used boids in the past, though there are some differences.
I am using Blender 2.8 (release candidate 3) though this tutorial can be done in previous versions (there may be some differences). If you want to download blender 2.8 then click here.
Tracking the shot was not too difficult and considering the motion of the camera, I only added 10 tracking markers.
If you are using your own background footage then be sure to remember the focal length that you shot in.
The background footage I used was downloaded (download here) so I had to let blender work out what my focal length should be.
Once we are happy with the Average solve error, we can then setup our 3d scene.
With the click of a single button, Blender has set up our 3d view along with creating the necessary nodes that we need to compose the shot.
In this example I remove the background layer (but you may want to keep it and have reflections).
Then using a particle system, we change a few settings to get the effect that we are looking for.
When it comes to rendering, you can render with either Cycles or Eevee. I decided to render with both. I'm not sure if it's a bug but when we activate motion blur in Eevee it doesn't seem to work.
One of the benefits of rendering with Eevee is the Speed. It took me about 1 hr and 15 mins for Cycles to render this whole animation. Whereas Eevee took only 20 mins.
I also considered adding a light cast to the water but in the end I decided that the Glow from the flies probably wouldn't reach the water.
If you did want a reflection in the water, you could add a mix node and connect the render layers to that mix node. Then add a translate node and move the position of the new fireflies to be below the original fireflies (I would also add a scale node and scale them on the Y axis a little). Then play around with the blend mode and factor to get something that you like.
You can then add your color grading and finalize your shot.
Hopefully you enjoyed this video and as always,
Thanks for watching!..
22 April, 2019
Taipei Towers [VFX]
In this video we will be turning the Taipei 101 into a Sci-fi Energy Tower.
Check out the Preview.
We will duplicate the Taipei tower a couple of times (though this can be done in any photo editing software, I prefer to use blender incase there is any change in lighting from the camera, it would look odd if it was a single image) and then using the Animation Nodes Addon (link below) we can create an awesome stylized Energy Beam.
Taipei Towers Tutorial.
Now I should note, this is the first time I have used the Animation Nodes Addon and I am still learning how to use it. Since there are tons more nodes to use we can create a whole load of different effects.
Now some of you may already use Animation Nodes and if you do, then you will already know how to create this Energy Beam effect. I followed along a tutorial by Chris Prenninger, so you guys should certainly check it out the tutorial here.
As I said, I am very new to this addon and would liked to have duplicated the effect two times, and I am sure any seasoned user of Animation nodes would know how to do this very easily.
If you guys have any comments of suggestions are greatly welcome!.
So yeah, I really like Animation Nodes and will have to set some time aside to learn more about it!.
Since I couldn't duplicate the effect as I hoped, and I did not find much information that would help, so I decided to render out the effect, then re position the Energy beam in the 3D view, then I rendered it, then re-positioned it a third time and rendered that.
Then I rendered out the Background video and added the Energy beam in Post.
As I said, there would certainly be a way to just duplicate the effect rather than having to do it the way I did.
I hope you guys enjoyed this Video and if you do start using Animation Nodes, let us know what you think of it in the comments below!.
As always, Thanks for reading!.
You can download -
Animation Nodes by Jacques Lucke, here.
Taipei Tower Video, here.
Labels:
animation nodes,
b3d,
blender 2.8,
energy beam,
taipei,
towers,
tutorial,
vfx
08 April, 2019
How to Turn People into Ghosts
In this week's Tutorial we will be turning someone into a Ghostly Companion in "How to turn people into ghosts" using Blender 2.8 (this effect can also be done in Blender 2.79).
Check out the Preview here,
or
You can watch the Tutorial here.
First we will create a Mask around the person we wish to turn into a Ghost. I recommend taking more time with the masking then I did, your shots look much cleaner with better Masks.
Then in the compositing, we can save time by Appending a "Super Node" that we created previously. Though if you have not created a Super Node you can either check out our previous blog post here, or follow along in the Video where we create a quick Super Node to add a fake background (in place of the ghost).
Then with the help of a couple of mix nodes we can add our Ghostly Companion. When downloading clips like this, it's often hard to get something perfect.
Download the Video here.
For example, we could also replicate the missing part of the man (that being, part of his right shoulder, his neck and some parts of his ears).
If I was creating this shot for myself and had direction over the scene. I would prefer to shoot the man on the bench, alone. Then shoot the woman in front of a Green screen.
This would ensure that we see all of the man through the ghost.
We could recreate most of the man in the Node Editor, and a couple of masks. We would need to add a fake body, neck and ears, before the Ghost effect. From the tests I tried, they looked okay but I hope you guys get the idea and are able to find use for this effect.
If you do create something be sure to post a link in our Facebook group!.
Thanks for watching!.
Labels:
2.8,
blender 2.8,
blender tutorial,
ghost,
masking,
super node,
vfx,
vfx tutorial
01 April, 2019
How to Remove People from Video [Blender 2.8]
In this video we will be revisiting a former Tutorial, "How to remove people / objects from video", only this time in 2.8. There are some differences between version 2.79 and 2.8, along with some improvements to our workflow.
Watch the Tutorial here.
In this example video we have a few more things we need to remove and I think we did a pretty good job. Of course if you spend more time on your project you can make it look even better.
The video quality was not the best and then with Compression it looks even worse, so be sure to use high quality Background Videos when you are working on your own projects.
Since we have a few people we want to remove from our video, we will be creating "Super Nodes" or Mega/Uber Nodes to help speed up our workflow. Once we have created a new Node Group (Which I decided to call it the Patch Node..) we can bring that node into future projects and save even more time.
I hope this technique helps you in your future projects! if you found this helpful be sure to hit that subscribe button for more..
As always, thanks for watching!.
Links
Background Video
25 March, 2019
Robot Eyes in Blender 2.8
![]() |
| (Robot Eyes Result) |
In this Video, we will be recreating a familiar VFX Tutorial, Robot Eyes.
Watch the preview here.
Keen viewers of my channel will already be aware of the "Robot Eyes" Tutorial we have done previously. Since there are many changes from 2.79 to 2.8, I thought it would be interesting to recreate this VFX shot within Blender 2.8.
We will utilize the new VFX workspace (which helps optimize our workflow), though you can always create your own Workspace.
First we will track our footage and though some things have changed, it feels very similar to 2.79. I did have some trouble though, I couldn't find the option to "Show Search Size". We can see (and change) the search size as a Value but there was no representation on screen.
Now maybe I am missing something (If I am please be sure to let me know in the comments) or this could be a bug but many of you know, I like to use that option a lot.
We then use the "Masking" section and then rotoscope the eye (and more importantly the blink). We did a tutorial on Masking. If you are having trouble with masking, you can check out there Tutorial here.
Now we are ready to add our tracking information to the 3D Scene. This can be done with the click of a single button. Though when I tried this the first time, I encountered a bug. (When you add the tracks to the 3D scene. If your Markers do not move when you play through the timeline, simply move to a random point on the timeline then press Ctrl + Z. Your Markers should now move).
Remember, 2.8 is in Beta and some bugs will occur. So if you encounter this bug or another, be sure to report it.
Then in the 3D scene, we can add an "Image as Plain" and add the Robot Eye Texture. If you want to use the same image, you can download it here (CC-0).
Then we need to change a couple of settings to make the Alpha Transparency work (it would be nice to make these changes as we import the image but it take only a couple of seconds to make the changes).
Duplicate your plain and Parent each of them to the Trackers and now we can move on to the "Compositing" section.
For the compositing, we look at adding the Robot Eyes to the Live Action Footage we have been working with. I decided to brighten the "Whites" of the eyes to add some more "Surrealism" to the shot (Though having robot eyes may be surreal enough?). As we do this we create some pretty useful custom Masks.
I also wanted to add a nice shadow on the eye to add depth and to try and make the shot look more realistic (since in the real world, the top eyelid would naturally cast a shadow on to the eye).
Then we can finish it off with some glare, glow and color grading. I took some screenshots of my node set-up. I tired to tidy things up and make it look cleaner (though it still looks a mess).
![]() |
| (Robot Eyes - Node Set-up) |
![]() |
| (Section One) |
![]() |
| (Section Two) |
![]() |
| (Section Three) |
Once you are happy with it, make sure you set the output, the correct video resolution (also make sure the % slider is at 100%). Also make sure you change your file type to FFMPEG video.
For the encoding, you can select the preset tab and choose "H_264 in MP3".
Then go ahead and hit Render (or you can use the shortcut, Ctrl + F12).
So, I hope you found this video helpful!. If you did be sure to give it a Like! and as always,
Thanks for watching..
Labels:
2.8,
2019,
blender,
blender 2.8,
blender tutorial,
nodes,
robot,
vfx,
vfx eyes,
vfx tutorial
21 March, 2019
Brightwall [Digital Matte Painting]
![]() |
Brightwall
[Digital Matte Painting]
Brightwall Preview
Digital Matte Painting Tutorial
I would have liked to have more time to spend on this Matte Painting and really make it look a lot better but unfortunately I was short on time.
The idea behind it though was to show how awesome Blender 2.8 and Eevee is.
(so I guess it doesn't really matter how crappy this example is, ;))
Using Eevee for our Matte Paintings will not only save us a whole bunch of time with rendering but also with many other improvements we can optimize our process even further.
I opened up the last Digital Matte Painting we did "Castle Rock" and rendered the same thing. In 2.79 it took around 38 seconds to render one frame but in 2.8 and with Eevee, it was rendered in a fraction of the time.
I hope this video shows you how cool 2.8 is and more importantly, how its possible to create a Digital Matte Painting in Blender 2.8
Now get out there and create something awesome (and something better than this example :D). If you do create a cool Digital Matte Painting, be sure to post a link in our Facebook group!.
As always, I hope you guys enjoyed this video and thanks for watching!..
Links -
Facebook Group
Blender Download
Background Image 001
Background Image 002
Fortress
Town
Face
Waterfall
Smoke Elements
Subscribe to:
Posts (Atom)