26 August, 2019

Patch Node in Blender 2.8


In this video, we will be looking at how to use and create the "Patch Node" (though you can call it what ever you want)

This group of Nodes will help us optimize our workflow and save us a whole bunch of time. There is nothing worse than having to repeat the same group of Nodes over and over again!. 


Creating custom Node Groups, allows us to reuse Nodes that we have created previously. So, if we need the same group of Nodes again, we can easily append in the ones we need. 


It's a good idea to build yourself a library of Node Groups that you use frequently. I tend to use the Patch Node a lot but there are other I find myself using more and more. 


Now (depending on what you are trying to do), you may not always need the same Node Groups

Though if you find that you have created the same group of Nodes more than once, maybe it's time to go ahead and save that group!. 

we first need to save a .blend file that will contain your Node Groups. 

You can think of it as a Library of custom Nodes where you can select the one(s) you need for your current project. Just be sure to name it something memorable, you don't want to waste time looking for an obscurely named file. 

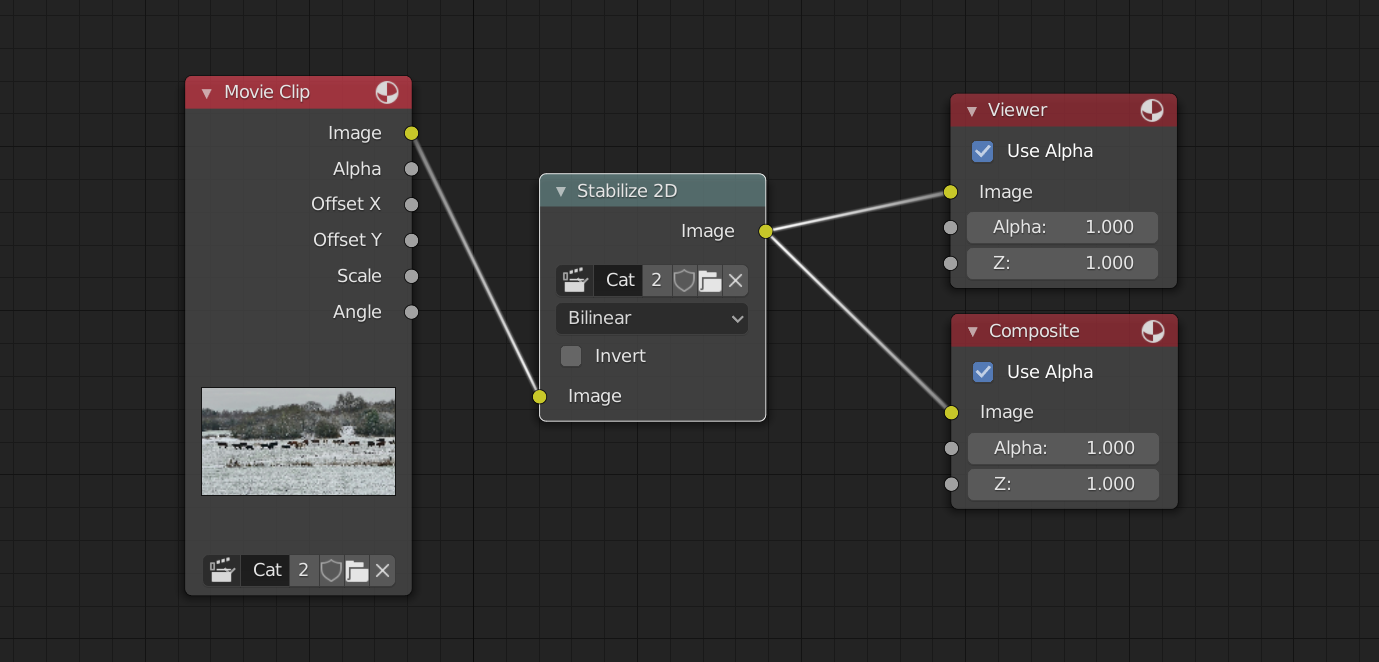
Then we can build our first custom Node Group - The "Patch Node". I know the name isn't great but you can name it what ever you want! (got a better name? let us know in the comments). 


You can download the "Patch Node", "Clone Node" and "Area Fill Node" here(you can just append that node group into your current file). 

As I mentioned, this group of nodes as been used in many different tutorials that we have done in the past, like the River Rapids VFX or the Taipei Towers and more!. 

I hope you not only create this Node Group but also many more. 

If you create an awesome node group be sure to let us know in our Facebook Group

I hope you enjoyed this tutorial or at least found it helpful. 

As always, thanks for reading!. 


19 August, 2019

Video Stabilization in Blender 2.8


In this video, we will be fixing our shaky or unstable footage using Blender 2.8 (download 2.8 here). To stabilize our videos, we only need a few tracks and a single node.

If you would like to follow along, you can download the video here

We will need One Track for the Location (though I like to add a few, just to give Blender more information), and Two Tracks for the Location.


 When adding the Location Track(s), it's a good idea to place them in the middle of the video or the "focal point"

I use three Tracks for the Location but you only need one. 


When adding the Location Tracks, you want to place one on each side of the screen. 

As you can see the Marker on the right is not exactly at the right edge of the screen, like the one on the left but this is fine and Blender has enough information to stabilize the video. 


Once we have changed a few settings we can jump to the Compositor and apply the Stabilization effect to our Video. 

I hope this tutorial helps with your projects and as always, Thanks for reading!.

11 August, 2019

How to Fix Lens Distortion in Blender 2.8


In this video, we will be fixing our shots that have Lens Distortion / Barrel or "Fish Eye" Distortion (as it's also known)

Most Camera's will have some level of Lens Distortion and none more so than Action Cameras like the GoPro and so on, leaving your shots looking rather disappointing. 

If you would like to follow along, you can download the original video here

You can also download Blender 2.8 here


As we can see from this example, the Lens Distortion is really quite bad. 


If you notice the people on the left, they now seem to be part of the group. 

In the original footage, they look slightly disconnected from the others. 


Though thanks to Blender and only one Node, we can easily fix this problem. 


I should add that I have tried this many times and for the most part, it looks pretty good. If you have multiple shots together, you may need to adjust the settings for each shot. 


I hope you found this helpful and as always, Thanks for reading!.. 

04 August, 2019

River Rapids in Blender 2.8


In this video, we will be adding some visual interest to our shot with the help of the Niagara Falls, and if you have followed along a previous tutorial you may have already created some "Uber Nodes" or "Mega Nodes"

By using these custom nodes, we can save a whole bunch of time!. I mean who wants to be creating the same group of nodes over and over again? (if you have not made any super nodes, don't worry!. We will composite this shot without them)


 This is the original footage we will be starting with (you can download the video here). 

It's a nice shot as it is, but I would like to add some more visual interest by adding rapids. 


 For the "Rapids" we use a Video of the Niagara Falls (download the video here).

 Using the Masks we created and a few color nodes we can blend the water asset into the scene. 


When adding an asset to a scene like this, it's always great when we can bring something from the original footage and put it on top of our asset (like we did here with the Rock)


I wanted to remove the Bridge and though it wasn't really causing a problem, I wanted the Rapids to pull the focus. 


Adding your final Color Grade will complete your shot. 


Make sure you are optimizing your workflow!.. 


I have spoke about optimizing your workflow in previous videos, creating the same group of nodes is tedious and if you find yourself doing it over and over, be sure to create and save your custom Nodes!.. 

Then you can append them into your future projects.

Not only does it save you time but it's also less of an "eyesore"


Have you already created your own custom node groups? let us know in the comment below!.

I hope you guys enjoyed this tutorial and if you create something awesome, be sure to share it with us in our Facebook Group!.. 

As always thanks for reading!..