Showing posts with label blender. Show all posts

04 June, 2021

[Blender Grease Pencil / 2D Animation] 2D Character Creation Series : Vlad Von Darkfall


In this Three Part Character Creation Series we will be creating a Host called Vlad for an Animated Podcast. 

You can check out Episode One here. Just a quick heads up, the accents are terrible!.

I wanted to see if it was possible for someone like me (Crappy Drawing skills and zero experience) could create something that might resemble an Animation. The results were, not as bad as I though. I mean sure there are plenty of areas that need improvement but for what it is, I am happy with it (kinda..)


Part One - Character Design.

In this video, we will be designing our Character. First I wanted to jot down some things about Vlad, he would be a Crazy Haired, Friendly Vampire with a slightly old fashion sense. We also need to set up a Construction and Detailing Brush. With our Brushes set up we can then draw three Variations of our character.

We first create some Construction (or sketch) lines to block in the shapes. Using our Construction Brush we can keep the lines messy. The main focus is to make sure the basic shapes look good. Then with our Detailing (or Inking) Brush we can go back and draw the details with much more precision.

If (unlike me) you have any kind of drawing skills, you will find it much easier to design your character. Since my drawing skills are lacking I had to go into Edit mode and play around with some of the strokes. We can also use a bunch of tools from Sculpt Mode (though in this video we didn't use it much).

With the the Three Variations done, I decided to mix and match some features of each character (except the Boris Johnson Looking guy at the end) to create the first draft of Vlad. Then with some Color Fills he was ready for Mobility.


Part Two - Rigging

In this video, we will be taking our Character and creating an Armature (or Rig) and adding some Constraints, giving our character the ability of movement.

We will need to add the rest of the Body and each of them will need to be a separate stroke. Now we have a couple of options when doing this. Instead of adding a new stroke each time (wasting our time needing to set everything up again) we can just use the original Head Stroke.

Simply add a new layer and draw a body part. Then (in edit mode) select only that part and press P. This will bring up the Separation Menu and we can Separate by stroke. You can do this for all the body parts.

We will need a Neck, Torso, Upper Arm, Lower Arm, Upper Leg, Lower Leg and foot. We can duplicate the Arms and legs to make things even easier. Once we have our pieces we can then add an armature.

Starting with a single bone, we can extrude out the part that we need. Then by adding some rotation, transform and Inverse kinematic Constraints we can make our Armature move more fluidly. IK constraints are really easy to set up and only need to do so once.

Then we can parent each of the Body Parts to each of the bones. Add a few empties for control and we are done with the Rigging.


Part Three - Lip Syncing (and more..)

In this video, we will be taking a look at my new favorite Modifier in order to not only Lip Sync but it can be used for a number of other things such as Blinks, Eyebrow Articulation, Hand shapes and more!.

With our character rigged and ready to go we just need to draw some Mouth Shapes. There are plenty of Lip Syncing Mouth Charts available online and I suggest using one of them as a guide. 


 If you want you can download Vlad's Mouth Shapes here.


Once we have our Mouth Shapes we can then use the Timer Offset Modifier. (NOTE: The Timer Offset Modifier is broken in Blender Version 2.92 In the video I am using Version 2.93 I believe the Modifier also works in Some Older Versions of Blender).

This Modifier is really useful, not only for Lip syncing but as I mentioned it's great for other things like Blinks, Expressions and anything else you want to quickly change the pose for.

When it comes to the actual Lip Syncing, you may need to "hold the frame" or extend the mouth position. It will always depend on how fast/slow your character is talking. 

For example, in the Video the character says "Hello". We will first add the H shape and extend it for an additional frame. Then the L shape for two frames and then finally the O shape. The Character Extends the O so I think we can hold the position for three or even four frames. Again this will always depend on the speed of your characters Audio.

If we mess things up and the timing is off? Don't worry!. We can move keyframes around and add new ones really easily. It's not too difficult, maybe just time consuming and depending on how long your animation is, you may be there for a little while. In the Animation I had two characters talking for a couple of Minuets and it didn't really take that long.

So in the end it turns out the Grease Pencil is easier to use than I once thought. I enjoyed making these videos and I hope you guys enjoyed them too. If you did enjoy this series be sure to look out for more Grease Pencil Tutorials!.

13 March, 2020

Shader Library - Update (version 1.03)


In this video, we take a look at the update for the Shader Library Version 1.03. You can download the add-on here.

If you would like to download the "Demo Scene" you can find it here.

Version 1.03, has some background improvements and layout changes. I have also add a shortcut : (Shift F). By pressing Shift F in the 3D View, it will call the "Add Shader Menu". You can add whatever shader(s) you want. 

The Potion Shader has also changed slightly. We can now enable or disable the Animation effect by using the Check box. If the Animation is enabled, then we can set the Start and End Frame for the animation. 


If you have any suggestions or comments, you can leave a comment here or in our Facebook Group. I hope you are finding this add-on helpful! As always thanks for reading!..


11 February, 2020

Shader Library Add-on - The Neon Shader (update 1.01)


The Shader Library add-on has a new addition. I would like to introduce the Neon Shader!. 

Download version 1.02 here

This Shader can be used for a cool Neon or other types of flickering lights. This was the result from the last Python Scripting Tutorial, where we looked at adding a keyframe and a Noise Modifier to a Shader.

We can control the Flickering by going to the Graph Editor. 


We can speed up or slow down the flickering effect by changing the "scale" value. If we increase the value, it will slow down the flickering. 


You can see in the preview video here, which shows two examples. 

The first is rendered with a Scale value of 1. The second Example has a Scale value of 6.

We can also play around with the Strength, Phase, Offset and Depth to suit our needs and I suggest playing around with different values to get more varied results. 


This Shader can be used for both Cycles and Eevee.
 
I hope you find this Shader helpful and as always thanks for reading!.


26 January, 2020

Blender Python Tutorial: How to create an Add-on - The Shader Library [bpy]


In this video, we will be creating an add-on for the Shader Node Editor called the Shader Library. 

This Add-on was created for this tutorial and is not meant to be anything other than to demonstrate how it's possible but if you want to download the script you can download it here

If you guys like it, I could look at developing it further but keep in mind that there are probably better Add-ons like this already!. 


Using the knowledge from the previous videos and utilizing the template scripts, we can quickly create a Main Panel and add some bl_info, (Remember without the bl_info we can not install our add-on from file)

In the previous videos, we have been using Operations that are readily available, though in this example there are no functions that will create the Shaders that we want. 

We have to create a custom Operator and then define (with python) what nodes we want to add to our Shader. We also need to then connect (or link as it's actually known) the nodes together.

I find it a good idea to add and arrange the nodes in a separate window as I write the code. It helps me keep track of what nodes I have added and it also lets me see how I need to link the nodes. 


Alternatively, I would suggest writing down the Nodes you want to use before hand. 


 If you find moving the Nodes around pain, this may help. 


The .location parameter will move your node anywhere you want but knowing which set of numbers will move it, Horizontally or Vertically is a bit of trial and error at first.

(-200, -90) - The numbers on the left will move the node to the Left or Right. The numbers on the right will move the node Up or Down.

So if we imagine that the center of the screen 0, if we want to move the Emission node to the Left we would type (-200,0). If we want the Node to move to the right we would type (200,0)

Using that logic, to move up would be (0,200), and down would be (0.-200). 


For this Example, I start by creating a Diamond Shader. It doesn't matter what kind of Shader you want to create, the process is always the same.
 

We first create a Material and call it Diamond. Then we add the nodes that are required. 


Once we have finished writing our custom Operator, we need to make sure we register and unregister all classes and then add the button (on the Main Panel) to call the custom operator. 

Adding new Shaders becomes much easier since we can use the first Custom Operator as a template. We can copy and paste most of the code we have just written and then go through and change the appropriate details.

I decided to add a few Shaders that I thought were interesting and there are hundreds of  different Shaders we could create.

Think we should add a specific Shader?. Let us know in the comments..

The Metallic Shaders are really basic. Though if you play around with some of the settings you can get some nice looking results. I would also make sure to follow your normal PBR Process when creating Gold, Silver, Copper ect


I wanted this add-on to take out some of the hassle and speed up our workflow.

I hope you guys find this video helpful and as always, thanks for Reading!
.

17 January, 2020

Scripting Continued - Blender Python - bpy


In this video, we will be continuing scripting our "Object Adder" Add-on.

We will add some more functions such as the Smooth Shading option, Add a Modifier and more.

We also look at creating two more panels (for simplicity we call them Panel A and Panel B). After creating the new Panels we can add them to the Main Panel as "Sub Panels". 


It's really easy to add a panel to another panel and it only requires one property. By adding the, bl_parent_id = 'PT_MainPanel' 
we are telling 'Panel A' to be a child of the Main Panel.


By adding the, bl_options = {'DEFAULT_CLOSED'} 
we are telling the Panel to be minimized by default. If you have a whole bunch of panels open by default it can be a pain for the user to navigate to the section they intend to use.


 Once we are happy with the Add-on we need to make sure we add the bl-info at the beginning of the script (you can see the full script below). 

Without this Information, we can not install the Add-on. 


With our add-on now installed, we can use it without needing to run the script nor mess around with any settings.


Of course this Add-on is super simple and we can always add, change and improve this add-on but I wanted to create something easy to follow and I hope I have managed to inspire you to take this further and start to make awesome add-ons!..

If you want to use this script you can copy and paste the text below or you can click here.

In the Next Tutorial, we will be creating an Add-on that's a little more advanced but with the knowledge we have learned over the last two videos, it should be easier to pick up.

Again, I hope you found this Tutorial helpful! be sure to let us know what you think of this series or if you want more videos like this? 


Script result : 

__________________________________________________________________________


bl_info = {
    "name": "Object Adder",
    "author": "Darkfall",
    "version": (1, 0),
    "blender": (2, 80, 0),
    "location": "View3D > Toolbar > Object Adder",
    "description": "Adds objects and other functions to help our workflow (Tutorial Result)",
    "warning": "",
    "wiki_url": "",
    "category": "Add Mesh",
}

import bpy

    #This is the Main Panel (Parent of Panel A and B)
class MainPanel(bpy.types.Panel):
    bl_label = "Object Adder"
    bl_idname = "PT_MainPanel"
    bl_space_type = 'VIEW_3D'
    bl_region_type = 'UI'
    bl_category = 'Object Adder'
   
    def draw(self, context):
        layout = self.layout
        layout.scale_y = 1.2
       
        row = layout.row()
        row.label(text= "Add an object", icon= 'OBJECT_ORIGIN')
        row = layout.row()
        row.operator("mesh.primitive_cube_add", icon= 'CUBE', text= "Cube")
        row.operator("mesh.primitive_uv_sphere_add", icon= 'SPHERE', text= "Sphere")
        row.operator("mesh.primitive_monkey_add", icon= 'MESH_MONKEY', text= "Suzanne")
        row = layout.row()
        row.operator("curve.primitive_bezier_curve_add", icon= 'CURVE_BEZCURVE', text= "Bezier Curve")
        row.operator("curve.primitive_bezier_circle_add", icon= 'CURVE_BEZCIRCLE', text= "Bezier Circle")
       
       
        row = layout.row()
        row.operator("object.text_add", icon= 'FILE_FONT', text= "Add Font")
        row = layout.row()


    #This is Panel A - The Scale Sub Panel (Child of MainPanel)
class PanelA(bpy.types.Panel):
    bl_label = "Scale"
    bl_idname = "PT_PanelA"
    bl_space_type = 'VIEW_3D'
    bl_region_type = 'UI'
    bl_category = 'Object Adder'
    bl_parent_id = 'PT_MainPanel'
    bl_options = {'DEFAULT_CLOSED'}
   
    def draw(self, context):
        layout = self.layout
        obj = context.object
       
        row = layout.row()
        row.label(text= "Select an option to scale your", icon= 'FONT_DATA')
        row = layout.row()
        row.label(text= "      object.")
        row = layout.row()
        row.operator("transform.resize")
        row = layout.row()
        layout.scale_y = 1.2
       
        col = layout.column()
        col.prop(obj, "scale")


    #This is Panel B - The Specials Sub Panel (Child of MainPanel)
class PanelB(bpy.types.Panel):
    bl_label = "Specials"
    bl_idname = "PT_PanelB"
    bl_space_type = 'VIEW_3D'
    bl_region_type = 'UI'
    bl_category = 'Object Adder'
    bl_parent_id = 'PT_MainPanel'
    bl_options = {'DEFAULT_CLOSED'}
   
    def draw(self, context):
        layout = self.layout
       
        row = layout.row()
        row.label(text= "Select a Special Option", icon= 'COLOR_BLUE')
        row = layout.row()
        row.operator("object.shade_smooth", icon= 'MOD_SMOOTH', text= "Set Smooth Shading")
        row.operator("object.subdivision_set", icon= 'MOD_SUBSURF', text= "Add Subsurf")
        row = layout.row()
        row.operator("object.modifier_add", icon= 'MODIFIER')


    #Here we are Registering the Classes       
def register():
    bpy.utils.register_class(MainPanel)
    bpy.utils.register_class(PanelA)
    bpy.utils.register_class(PanelB)

    #Here we are UnRegistering the Classes   
def unregister():
    bpy.utils.unregister_class(MainPanel)
    bpy.utils.unregister_class(PanelA)
    bpy.utils.unregister_class(PanelB)

    #This is required in order for the script to run in the text editor   
if __name__ == "__main__":
    register() 


12 January, 2020

An Introduction to Scripting (Blender Python - bpy)


In this video,we will be taking a look at Scripting with Blender and Python.

Before we begin, I should mention that I am in no way an expert and in fact, I have only been learning Python (and scripting in general) for a short time. That being said, I went from knowing absolutely nothing - to developing the Darkfall VFX Nodes Add-on, and would like to share with you some tips and maybe a basic introduction into Scripting. 


  We first start by arranging our layout. There are three important windows we need in order to start scripting and they can be placed anywhere in your layout. It's a good idea to save a template file (so you can use a fresh scripting start up file each time). 

Learning Python and Scripting may seem daunting at first but with a little time and patience you can create something useful. 


If you do get stuck and need some help you can always check out the Blender API, there's a stockpile of really useful information along with some nice examples. You can also check out The Blender Stack Exchange, I have been saved many times by helpful people over at the Stack Exchange and certainly recommend using it. 


Blender also comes with many Python Templates for you to check out. I find it a good idea to have a look at how other scripts are structured and many times they can be slightly adapted to fit our needs.

Now, I assume that anyone reading this blog post will have their own idea for an add-on and many things in this introduction may not apply to what you need but I think having a basic understanding of creating a simple script will go a long way when it comes to tackling your own idea. 


In this Introduction, we will be creating a very simple add-on that I dubbed the "Object Adder"... With just a few lines of code we have created our first add-on!. Congratulations!.. 


We created a Panel in the 3D View that has a bunch of buttons, that when pressed add objects. So yeah, it's obviously not that impressive but if (like me) you thought you wouldn't ever be able to code something, you have just made your first steps into the new world of Python.


There are some different ways we can layout the panel and making it look "pretty" can always come later. I like to make sure everything is working and then we can go back and make some adjustments. The first version of the Darkfall VFX Nodes add-on was a mess. Not only did it look bad but it also was not as simple to use as it is now. 

Thanks to those who have downloaded and used the Add-on, I took their feedback and started to develop newer versions. So with that being said, If you find yourself stuck or need help improving your add-on, be sure to take all the feedback you can get. 

Since we could not cover everything in a single Video, I will be creating more videos on scripting and hopefully you guys will find them helpful. If you have any suggestions on what you want to see, make sure you leave a comment in the video and let us know!.

If you guys want to check out the code that we wrote in the video, you can find it here:


import bpy

class TestPanel(bpy.types.Panel):
    bl_label = "Object Adder"
    bl_idname = "PT_TestPanel"
    bl_space_type = 'VIEW_3D'
    bl_region_type = 'UI'
    bl_category = 'My 1st Addon'
   
    def draw(self, context):
        layout = self.layout
       
        row = layout.row()
        row.label(text= "Add an object", icon= 'OBJECT_ORIGIN')
        row = layout.row()
        row.operator("mesh.primitive_cube_add", icon= 'CUBE')
       
        row.operator("mesh.primitive_uv_sphere_add", icon= 'SPHERE')
        row = layout.row()
        row.operator("object.text_add", icon= 'FILE_FONT', text= "Font Button")


def register():
    bpy.utils.register_class(TestPanel)
   
def unregister():
    bpy.utils.unregister_class(TestPanel)
   
if __name__ == "__main__":
    register()


26 August, 2019

Patch Node in Blender 2.8


In this video, we will be looking at how to use and create the "Patch Node" (though you can call it what ever you want)

This group of Nodes will help us optimize our workflow and save us a whole bunch of time. There is nothing worse than having to repeat the same group of Nodes over and over again!. 


Creating custom Node Groups, allows us to reuse Nodes that we have created previously. So, if we need the same group of Nodes again, we can easily append in the ones we need. 


It's a good idea to build yourself a library of Node Groups that you use frequently. I tend to use the Patch Node a lot but there are other I find myself using more and more. 


Now (depending on what you are trying to do), you may not always need the same Node Groups

Though if you find that you have created the same group of Nodes more than once, maybe it's time to go ahead and save that group!. 

we first need to save a .blend file that will contain your Node Groups. 

You can think of it as a Library of custom Nodes where you can select the one(s) you need for your current project. Just be sure to name it something memorable, you don't want to waste time looking for an obscurely named file. 

Then we can build our first custom Node Group - The "Patch Node". I know the name isn't great but you can name it what ever you want! (got a better name? let us know in the comments). 


You can download the "Patch Node", "Clone Node" and "Area Fill Node" here(you can just append that node group into your current file). 

As I mentioned, this group of nodes as been used in many different tutorials that we have done in the past, like the River Rapids VFX or the Taipei Towers and more!. 

I hope you not only create this Node Group but also many more. 

If you create an awesome node group be sure to let us know in our Facebook Group

I hope you enjoyed this tutorial or at least found it helpful. 

As always, thanks for reading!. 


19 August, 2019

Video Stabilization in Blender 2.8


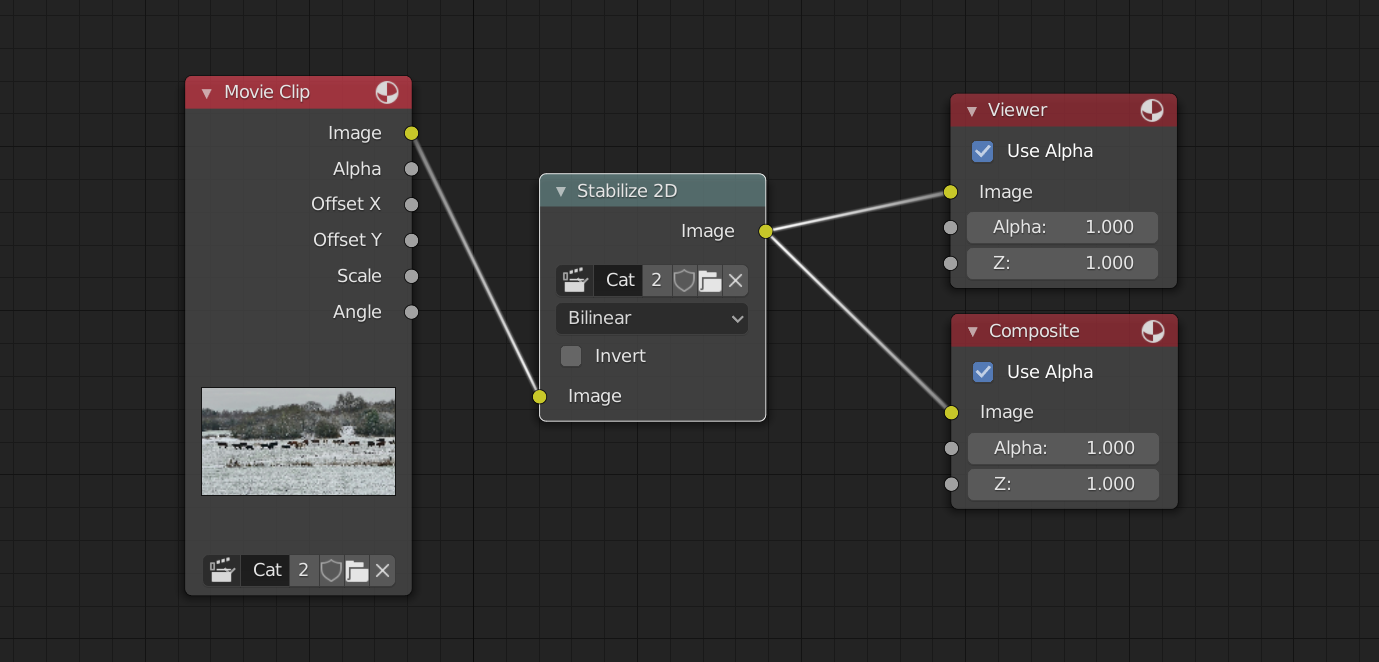
In this video, we will be fixing our shaky or unstable footage using Blender 2.8 (download 2.8 here). To stabilize our videos, we only need a few tracks and a single node.

If you would like to follow along, you can download the video here

We will need One Track for the Location (though I like to add a few, just to give Blender more information), and Two Tracks for the Location.


 When adding the Location Track(s), it's a good idea to place them in the middle of the video or the "focal point"

I use three Tracks for the Location but you only need one. 


When adding the Location Tracks, you want to place one on each side of the screen. 

As you can see the Marker on the right is not exactly at the right edge of the screen, like the one on the left but this is fine and Blender has enough information to stabilize the video. 


Once we have changed a few settings we can jump to the Compositor and apply the Stabilization effect to our Video. 

I hope this tutorial helps with your projects and as always, Thanks for reading!.

11 August, 2019

How to Fix Lens Distortion in Blender 2.8


In this video, we will be fixing our shots that have Lens Distortion / Barrel or "Fish Eye" Distortion (as it's also known)

Most Camera's will have some level of Lens Distortion and none more so than Action Cameras like the GoPro and so on, leaving your shots looking rather disappointing. 

If you would like to follow along, you can download the original video here

You can also download Blender 2.8 here


As we can see from this example, the Lens Distortion is really quite bad. 


If you notice the people on the left, they now seem to be part of the group. 

In the original footage, they look slightly disconnected from the others. 


Though thanks to Blender and only one Node, we can easily fix this problem. 


I should add that I have tried this many times and for the most part, it looks pretty good. If you have multiple shots together, you may need to adjust the settings for each shot. 


I hope you found this helpful and as always, Thanks for reading!.. 

04 August, 2019

River Rapids in Blender 2.8


In this video, we will be adding some visual interest to our shot with the help of the Niagara Falls, and if you have followed along a previous tutorial you may have already created some "Uber Nodes" or "Mega Nodes"

By using these custom nodes, we can save a whole bunch of time!. I mean who wants to be creating the same group of nodes over and over again? (if you have not made any super nodes, don't worry!. We will composite this shot without them)


 This is the original footage we will be starting with (you can download the video here). 

It's a nice shot as it is, but I would like to add some more visual interest by adding rapids. 


 For the "Rapids" we use a Video of the Niagara Falls (download the video here).

 Using the Masks we created and a few color nodes we can blend the water asset into the scene. 


When adding an asset to a scene like this, it's always great when we can bring something from the original footage and put it on top of our asset (like we did here with the Rock)


I wanted to remove the Bridge and though it wasn't really causing a problem, I wanted the Rapids to pull the focus. 


Adding your final Color Grade will complete your shot. 


Make sure you are optimizing your workflow!.. 


I have spoke about optimizing your workflow in previous videos, creating the same group of nodes is tedious and if you find yourself doing it over and over, be sure to create and save your custom Nodes!.. 

Then you can append them into your future projects.

Not only does it save you time but it's also less of an "eyesore"


Have you already created your own custom node groups? let us know in the comment below!.

I hope you guys enjoyed this tutorial and if you create something awesome, be sure to share it with us in our Facebook Group!.. 

As always thanks for reading!.. 

28 July, 2019

Flight of the fireflies in Blender 2.8


In this video we will be creating more fireflies. With the help of the Boid Particle system and a bit of tracking we can easily create a surreal fantasy scene. 

We have done tracking and have used boids in the past, though there are some differences. 

I am using Blender 2.8 (release candidate 3) though this tutorial can be done in previous versions (there may be some differences). If you want to download blender 2.8 then click here.

Tracking the shot was not too difficult and considering the motion of the camera, I only added 10 tracking markers. 

If you are using your own background footage then be sure to remember the focal length that you shot in. 

The background footage I used was downloaded (download here) so I had to let blender work out what my focal length should be. 

Once we are happy with the Average solve error, we can then setup our 3d scene. 

With the click of a single button, Blender has set up our 3d view along with creating the necessary nodes that we need to compose the shot. 

In this example I remove the background layer (but you may want to keep it and have reflections)

Then using a particle system, we change a few settings to get the effect that we are looking for. 

When it comes to rendering, you can render with either Cycles or Eevee. I decided to render with both. I'm not sure if it's a bug but when we activate motion blur in Eevee it doesn't seem to work. 

One of the benefits of rendering with Eevee is the Speed. It took me  about 1 hr and 15 mins for Cycles to render this whole animation. Whereas Eevee took only 20 mins

I also considered adding a light cast to the water but in the end I decided that the Glow from the flies probably wouldn't reach the water. 

If you did want a reflection in the water, you could add a mix node and connect the render layers to that mix node. Then add a translate node and move the position of the new fireflies to be below the original fireflies (I would also add a scale node and scale them on the Y axis a little). Then play around with the blend mode and factor to get something that you like.

You can then add your color grading and finalize your shot.

Hopefully you enjoyed this video and as always, 

Thanks for watching!.. 

09 July, 2019

Zombie Suzanne [3D Printing]


In this video, we will be doing another "Suzanne Print" where we take the Blender Mascot Suzanne and turn her into something else. 

Today, we turn Suzanne into a Zombie

As we did last time, we will start with a Basic Mesh. (Which you can download here)

This is simply an edited version of the original Suzanne Model (The difference being; One has the Eyes connected and the other does not)

You can use the original Suzanne Mesh (but, be sure to connect the eyes to the Head mesh).

I then removed and Eye, Changed the smile to something more fitting and then added an "Exposed Brain". 

In the process of creating the brain, I used a free image from Textures.com and you can find it here


Then I exported the model and sent it off to the printer. I used the "Dora" by Easythreed (you can check out the review we did here)

After a couple of hours the print was ready to prime and paint. 


I admit, the paint job sucks and I really need to get better but I'm sure you guys could do a better job. 

If you want to download this Zombie Model as an STL file, you can download it here


As my collection grows I wonder what will come next?. 

If you guys have any suggestions be sure to let us know in the comments below!.

I hope you enjoyed this post and as always, 

Thanks for reading.. 


06 May, 2019

Pirate Suzanne [3D Printing]


In this video, we will be doing another "Suzanne Print" where we take the Blender Mascot Suzanne and turn her into something else. 

So continuing our Pirate Theme (from last week), I wanted to turn Suzanne into a swash-buckling Pirate. 

If you want to follow along, you can download the Suzanne Base Mesh here (when it came to printing, I changed the Earrings to "studs" but the model has the hoops), or you can download the final model as an STL here


Turning Suzanne into a Pirate was pretty simple, and now my collection of "Alter" Suzanne's is growing and I think it turned out pretty well (though the paint job sucks)

After I printed the Model, then using a couple of different grades of sandpaper I refined the model. I then applied a few coats of Primer/Filler Spray paint and sanded it again. 

Then I used Acrylic's for the colors and then some gold leaf for the tooth and the Stud earrings. Again my painting skills are not the best and I'm sure you guys could get better results if you spend more time on it.  

I have a few more Ideas I want to do in the future but if you guys have any suggestions, be sure to let me know in the comments below. 

I hope you found this video helpful, if you did be sure to like and subscribe for more!

and as always, thanks for reading!

29 April, 2019

Pirate Coins [3D Printing]


In this video, we will be creating Pirate Coins. 
They are fairly simple to create and it took hardly any time at all to print.

Using a reference image, I create the Skull shape and refine it with a Subsurf Modifier. 


You can use any image you want or you can model from memory, and if you do create something cool be sure to post a comment below. 

Once we have our two objects we can simply join them using a Boolean Modifier. 


Once we are happy with it, we need to make sure we set the correct Unit scale otherwise we will have some trouble when it comes to the printing. 

After I exported it as an STL (which you can download here). I then sliced and printed it. After printing, I first coated the coins in a Primer/filler and then painted on some gold leaf (or you can use gold spray paint).

I wanted them to look old and worn so I painted them with some Acrylic paint to try and "age" them. 


Hopefully you enjoyed this video! and as always, thanks for reading!.