Showing posts with label beginner. Show all posts

10 August, 2020

Blender Python Tutorial: How to Create and Assign a Shader Material


In this video, we will be taking a look at not only creating a Shader Material but also assigning that material to the currently selected object.

We can create something simple or something complex but both ways will be using an Operator. We first create a panel where our button will live. Then we can create a simple operator, that when pressed will create and assign a Shader Material to the Selected Object.

If you want the user to have any options, we can easily upgrade the simple operator and make it become a popup dialog box. We can then giver the user control over any setting or option. In this example we want the user to be able to set the color before adding the Shader.

We have covered popup dialog boxes in other posts and videos so be sure to check them out!. Though in this example we will be taking a look at the FloatVectorProperty.

In code that would be:
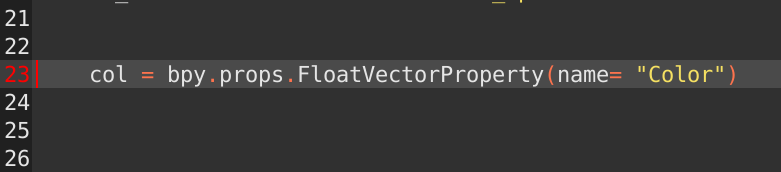
The Float Vector Property usually looks like this:
If we tried to use this in it's current state, it would kick up an error because as we know to change a Color Value we actually need four values. We need the Red, Green, Blue and Alpha Values.


We can just define the Size and set it to 4 to add another value:

Which would look like this:
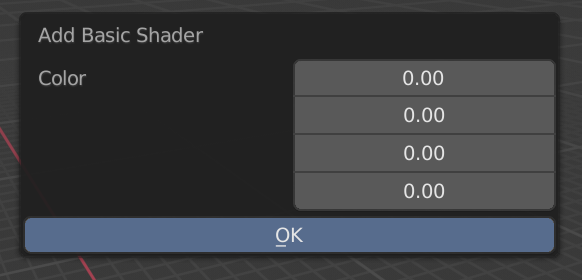

Now we have this, it doesn't look great. In fact it looks terrible, we want the user to have a good and quick experience.

So let's change this FloatVector slightly by defining the Sub type.

And that would turn the Float vector into something much more appealing:

If you want to set the default color (here you can see I set the default to green), you just need to define the default like so:

If you want to download the template script you can download the script here.

I hope you found this video helpful and as always thanks for reading!.

26 January, 2020

Blender Python Tutorial: How to create an Add-on - The Shader Library [bpy]


In this video, we will be creating an add-on for the Shader Node Editor called the Shader Library. 

This Add-on was created for this tutorial and is not meant to be anything other than to demonstrate how it's possible but if you want to download the script you can download it here. 

If you guys like it, I could look at developing it further but keep in mind that there are probably better Add-ons like this already!. 


Using the knowledge from the previous videos and utilizing the template scripts, we can quickly create a Main Panel and add some bl_info, (Remember without the bl_info we can not install our add-on from file). 

In the previous videos, we have been using Operations that are readily available, though in this example there are no functions that will create the Shaders that we want. 

We have to create a custom Operator and then define (with python) what nodes we want to add to our Shader. We also need to then connect (or link as it's actually known) the nodes together.

I find it a good idea to add and arrange the nodes in a separate window as I write the code. It helps me keep track of what nodes I have added and it also lets me see how I need to link the nodes. 


Alternatively, I would suggest writing down the Nodes you want to use before hand. 


 If you find moving the Nodes around pain, this may help. 


The .location parameter will move your node anywhere you want but knowing which set of numbers will move it, Horizontally or Vertically is a bit of trial and error at first.

(-200, -90) - The numbers on the left will move the node to the Left or Right. The numbers on the right will move the node Up or Down.

So if we imagine that the center of the screen 0, if we want to move the Emission node to the Left we would type (-200,0). If we want the Node to move to the right we would type (200,0)

Using that logic, to move up would be (0,200), and down would be (0.-200). 


For this Example, I start by creating a Diamond Shader. It doesn't matter what kind of Shader you want to create, the process is always the same.
 

We first create a Material and call it Diamond. Then we add the nodes that are required. 


Once we have finished writing our custom Operator, we need to make sure we register and unregister all classes and then add the button (on the Main Panel) to call the custom operator. 

Adding new Shaders becomes much easier since we can use the first Custom Operator as a template. We can copy and paste most of the code we have just written and then go through and change the appropriate details.

I decided to add a few Shaders that I thought were interesting and there are hundreds of  different Shaders we could create.

Think we should add a specific Shader?. Let us know in the comments..

The Metallic Shaders are really basic. Though if you play around with some of the settings you can get some nice looking results. I would also make sure to follow your normal PBR Process when creating Gold, Silver, Copper ect. 


I wanted this add-on to take out some of the hassle and speed up our workflow.

I hope you guys find this video helpful and as always, thanks for Reading!
.

17 January, 2020

Scripting Continued - Blender Python - bpy


In this video, we will be continuing scripting our "Object Adder" Add-on.

We will add some more functions such as the Smooth Shading option, Add a Modifier and more.

We also look at creating two more panels (for simplicity we call them Panel A and Panel B). After creating the new Panels we can add them to the Main Panel as "Sub Panels". 


It's really easy to add a panel to another panel and it only requires one property. By adding the, bl_parent_id = 'PT_MainPanel' 
we are telling 'Panel A' to be a child of the Main Panel.


By adding the, bl_options = {'DEFAULT_CLOSED'} 
we are telling the Panel to be minimized by default. If you have a whole bunch of panels open by default it can be a pain for the user to navigate to the section they intend to use.


 Once we are happy with the Add-on we need to make sure we add the bl-info at the beginning of the script (you can see the full script below). 

Without this Information, we can not install the Add-on. 


With our add-on now installed, we can use it without needing to run the script nor mess around with any settings.


Of course this Add-on is super simple and we can always add, change and improve this add-on but I wanted to create something easy to follow and I hope I have managed to inspire you to take this further and start to make awesome add-ons!..

If you want to use this script you can copy and paste the text below or you can click here.

In the Next Tutorial, we will be creating an Add-on that's a little more advanced but with the knowledge we have learned over the last two videos, it should be easier to pick up.

Again, I hope you found this Tutorial helpful! be sure to let us know what you think of this series or if you want more videos like this? 


Script result : 

__________________________________________________________________________


bl_info = {
    "name": "Object Adder",
    "author": "Darkfall",
    "version": (1, 0),
    "blender": (2, 80, 0),
    "location": "View3D > Toolbar > Object Adder",
    "description": "Adds objects and other functions to help our workflow (Tutorial Result)",
    "warning": "",
    "wiki_url": "",
    "category": "Add Mesh",
}

import bpy

    #This is the Main Panel (Parent of Panel A and B)
class MainPanel(bpy.types.Panel):
    bl_label = "Object Adder"
    bl_idname = "PT_MainPanel"
    bl_space_type = 'VIEW_3D'
    bl_region_type = 'UI'
    bl_category = 'Object Adder'
   
    def draw(self, context):
        layout = self.layout
        layout.scale_y = 1.2
       
        row = layout.row()
        row.label(text= "Add an object", icon= 'OBJECT_ORIGIN')
        row = layout.row()
        row.operator("mesh.primitive_cube_add", icon= 'CUBE', text= "Cube")
        row.operator("mesh.primitive_uv_sphere_add", icon= 'SPHERE', text= "Sphere")
        row.operator("mesh.primitive_monkey_add", icon= 'MESH_MONKEY', text= "Suzanne")
        row = layout.row()
        row.operator("curve.primitive_bezier_curve_add", icon= 'CURVE_BEZCURVE', text= "Bezier Curve")
        row.operator("curve.primitive_bezier_circle_add", icon= 'CURVE_BEZCIRCLE', text= "Bezier Circle")
       
       
        row = layout.row()
        row.operator("object.text_add", icon= 'FILE_FONT', text= "Add Font")
        row = layout.row()


    #This is Panel A - The Scale Sub Panel (Child of MainPanel)
class PanelA(bpy.types.Panel):
    bl_label = "Scale"
    bl_idname = "PT_PanelA"
    bl_space_type = 'VIEW_3D'
    bl_region_type = 'UI'
    bl_category = 'Object Adder'
    bl_parent_id = 'PT_MainPanel'
    bl_options = {'DEFAULT_CLOSED'}
   
    def draw(self, context):
        layout = self.layout
        obj = context.object
       
        row = layout.row()
        row.label(text= "Select an option to scale your", icon= 'FONT_DATA')
        row = layout.row()
        row.label(text= "      object.")
        row = layout.row()
        row.operator("transform.resize")
        row = layout.row()
        layout.scale_y = 1.2
       
        col = layout.column()
        col.prop(obj, "scale")


    #This is Panel B - The Specials Sub Panel (Child of MainPanel)
class PanelB(bpy.types.Panel):
    bl_label = "Specials"
    bl_idname = "PT_PanelB"
    bl_space_type = 'VIEW_3D'
    bl_region_type = 'UI'
    bl_category = 'Object Adder'
    bl_parent_id = 'PT_MainPanel'
    bl_options = {'DEFAULT_CLOSED'}
   
    def draw(self, context):
        layout = self.layout
       
        row = layout.row()
        row.label(text= "Select a Special Option", icon= 'COLOR_BLUE')
        row = layout.row()
        row.operator("object.shade_smooth", icon= 'MOD_SMOOTH', text= "Set Smooth Shading")
        row.operator("object.subdivision_set", icon= 'MOD_SUBSURF', text= "Add Subsurf")
        row = layout.row()
        row.operator("object.modifier_add", icon= 'MODIFIER')


    #Here we are Registering the Classes       
def register():
    bpy.utils.register_class(MainPanel)
    bpy.utils.register_class(PanelA)
    bpy.utils.register_class(PanelB)

    #Here we are UnRegistering the Classes   
def unregister():
    bpy.utils.unregister_class(MainPanel)
    bpy.utils.unregister_class(PanelA)
    bpy.utils.unregister_class(PanelB)

    #This is required in order for the script to run in the text editor   
if __name__ == "__main__":
    register()