19 July, 2021

Game Development: The Throne (Dev Log 002)


Since the Last post I have been working on a couple of things. Some smaller items that needed finishing and I have Added the Decrees and Upgrades.

Decrees: These are Edicts the player can Pass to improve the Kingdom. They will become available as the story progresses. They cost upfront Gold to set up, then each week the player will receive +gold or Boost to Troops.


There are currently 7 Decrees to Pass: 

  • Brewery - Improve the Drinking Establishments and gain gold. 
  • Education - With Education comes a better quality of life, and more Taxes!. 
  • Port - Construct a Central Port and Benefit from more Trade Income. 
  • Prison Reform - Not all Criminals are dangerous, they deserve better living conditions.
  • Roads - Constructing Paved Roads to ease the burden of daily travel.
  • Barracks Training - Renovate the Old Barracks and begin to Train the Troops.
  • Knighthood Program - Establish a Knighthood program and Design the Order. (Choose the Name, Style and Behavior)


Upgrades: These are additional bonuses to the Decrees the Player has Passed. Purchasing these Upgrades will give greater bonuses to their respected categories and may help with the End.

There are currently 6 Upgrades to Purchase:

  • Brewery Production - Increase Production and Export for more Trade Income. 
  • Carriageways - Improving the Roads for Carriages will improve Trade Income. 
  • Higher Education - With Higher Education, comes greater Taxes. 
  • Advanced Training - Train Elite Troops.
  • Admiralty Board - Establishing an Admiralty board will help Rule the Waves. 
  • Prison Reform (Parole) - Establish a Parole System for criminals deemed less dangerous. They can choose to serve in the Royal Army to reduce their sentence. 


*Note: These Numbers may change throughout the creation of this game. Cost's and Gains for everything will be balanced before release*

Saving/Loading - All the Variables have been added to the Save / Load system.

The Economy also reflects the Decrees and Upgrades. Cost's are deducted and Gains are Awarded.

Characters - Completed Sprites (Walk and Idle)

  • Lady Pellem (of Silverton)


15 July, 2021

Blender Tutorial: How to Make Particles Follow a Path


In this Video, we will be taking a look at Particles and how we can make them follow a path we define.

As many of you know by know (and are probably sick of hearing about), I am creating a 2D Game and in which, I needed to create some kind of visual of sending a mass of troops from one place to another. You can check out the Throne Game here.

Creating a Particle System to fit my need was a pretty easy task with Blender. 


We can start by aligning the Camera. First we need to jump to the Front View by pressing num-pad 1. Then Hold ctrl alt and num-pad 0


Then using the Image as Planes Add-on (that comes built-in) we can add our map or background image. 

If you do not see the "Image As Planes" option, you just need to activate the Add-on. 

Go to Edit > Preferences > Add-ons > Search for Image As Planes and Activate the Add-on.


The Map I used was created in a previous tutorial which can be found here


Patreon Subscribers can download the Map .blend file or the other Files here.


Once we have our map in place we need a few more things. Unlike about 99.9% of my tutorials we are actually going to USE the Default Cube!. By changing the Shader Color and Type, the Default Cube becomes the object that will be emitted in the Particle System.

Talking of which, we will need an object for the Particle System, let's add another Cube (the Default Cube is on fire today) and use that for the Particle Emitter. We do need to make some changes such as setting the Start and End, The Lifetime of the Particles and more!. Keep in mind these values will always change depending on your scene.

I wanted a clump of men (or Default Cubes I guess), to suddenly appear and march off to their destination. Though we can get many different variations depending on what effect we are looking for.

We will also need a Curve which will be our "Path" for the Particles to follow. You can use a Bezier Curve if you want but I prefer to add a plane. With the Plane, delete all but one Vert.


There is an easier way to get a single Vertex and to do that you just need to activate another built-in add-on called Extra Objects. 


 Once Activated, you can now add a whole bunch of new objects, but we are looking for Single Vertex.

Shift+A > Mesh > Single Vert. Not only will it add a Single Vertex but it place you inside Edit mode also. 


With our Single Vert we can now extrude a path going from one place to another. When we are happy with the Path we just need to convert it to a Curve and we can head over to the Physics Properties Tab.


By adding a Force-field Physics Property and playing around with a couple of settings we can easily get the effect I was aiming for. 

Again, you can go crazy and play around with the values to get lots of interesting Variations.


Then when we are happy with it we can bake and Render. You can choose to Render it out as an Image sequence or as a Video.

I hope you found this video helpful and as always thanks for reading!.

30 June, 2021

Game Development: The Throne (Dev Log 001)


As some of you may already know, recently I have been working on a side project. It's a 2D Side Scroller called The Throne.

It was suggested that I start creating Development Logs and share with you guys the progress of this little game.

So I decided to record pretty much all of the things I have done so far (not much since it's only been a week) you can check out the Video here.

The Throne is a small game where you become a King called Urkhart in the Mythical Land of Kanterbury.

As King you must manage your kingdom, Nobles and other types of annoyances. each week will present, Petitioner, Lords, Ladies and Public Figures. You can choose to act now or Dismiss them.


I have a bunch of things planned to implement such as Trade Agreements, Decrees, Loyalty, Morale and much more.


As you can tell the Art style is really not great and that's down to my poor drawing skills. That being said, I think it does convey an atmosphere and I think it will work for now. If in the future I can afford to hire an artist, I would like to redraw the assets or create a better version of the game with new assets.


Since this is my first real attempt at creating a Game, it will no doubt be rough and I appreciate the continued support!.

If you would like support my channel or this Game further, we now have a Patreon here. Get exclusive Development Updates, In game Content and more!.

10 June, 2021

2D Animation: Bird / Wing Flap


In this Video, we are going to Animate a 2D Bird / Wing flap animation as outlined in the "Animators Survival Tool Kit" by Richard Williams.  


The Book has a bunch of really useful Methods, Principles and Formulas perfect for beginner Animators. 

I have found it to be such a massive help with these videos and recommend checking it out here.


We first start by drawing our Bird. You can follow the previous videos principles by using construction lines to create a rough sketch and then go back and add your Detailing/Inking step. In this tutorial I create some materials instead.


Once the Bird has been drawn, we need to create a Chart. 

This will help show us the positions of the Wings on the given frame. It will also give us a visual representation to the Timing. We can see how much or little the wings are Easing in/out.


We will be talking about Easing in more detail in future videos but as outlined in the Book, the positions work well for a cartoon Bird / wing flap. 

In fact it could be used for a number of flying creatures not just Birds!.

Thankfully we only need to draw 8 Frames for the wings and then we can just duplicate them to loop the action. We could even use the Timer Offset Modifier much like we did in the Previous Lip Sync Tutorial.

Then finally we can add the Up/Down Motion. As the Wings go down, the Body goes Up and vice versa.

I hope you found this video helpful and as always thanks for watching!.


(Note: The Link to the Book is an Affiliate link)

04 June, 2021

[Blender Grease Pencil / 2D Animation] 2D Character Creation Series : Vlad Von Darkfall


In this Three Part Character Creation Series we will be creating a Host called Vlad for an Animated Podcast. 

You can check out Episode One here. Just a quick heads up, the accents are terrible!.

I wanted to see if it was possible for someone like me (Crappy Drawing skills and zero experience) could create something that might resemble an Animation. The results were, not as bad as I though. I mean sure there are plenty of areas that need improvement but for what it is, I am happy with it (kinda..)


Part One - Character Design.

In this video, we will be designing our Character. First I wanted to jot down some things about Vlad, he would be a Crazy Haired, Friendly Vampire with a slightly old fashion sense. We also need to set up a Construction and Detailing Brush. With our Brushes set up we can then draw three Variations of our character.

We first create some Construction (or sketch) lines to block in the shapes. Using our Construction Brush we can keep the lines messy. The main focus is to make sure the basic shapes look good. Then with our Detailing (or Inking) Brush we can go back and draw the details with much more precision.

If (unlike me) you have any kind of drawing skills, you will find it much easier to design your character. Since my drawing skills are lacking I had to go into Edit mode and play around with some of the strokes. We can also use a bunch of tools from Sculpt Mode (though in this video we didn't use it much).

With the the Three Variations done, I decided to mix and match some features of each character (except the Boris Johnson Looking guy at the end) to create the first draft of Vlad. Then with some Color Fills he was ready for Mobility.


Part Two - Rigging

In this video, we will be taking our Character and creating an Armature (or Rig) and adding some Constraints, giving our character the ability of movement.

We will need to add the rest of the Body and each of them will need to be a separate stroke. Now we have a couple of options when doing this. Instead of adding a new stroke each time (wasting our time needing to set everything up again) we can just use the original Head Stroke.

Simply add a new layer and draw a body part. Then (in edit mode) select only that part and press P. This will bring up the Separation Menu and we can Separate by stroke. You can do this for all the body parts.

We will need a Neck, Torso, Upper Arm, Lower Arm, Upper Leg, Lower Leg and foot. We can duplicate the Arms and legs to make things even easier. Once we have our pieces we can then add an armature.

Starting with a single bone, we can extrude out the part that we need. Then by adding some rotation, transform and Inverse kinematic Constraints we can make our Armature move more fluidly. IK constraints are really easy to set up and only need to do so once.

Then we can parent each of the Body Parts to each of the bones. Add a few empties for control and we are done with the Rigging.


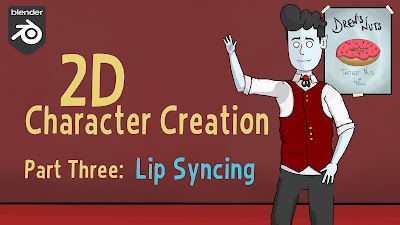
Part Three - Lip Syncing (and more..)

In this video, we will be taking a look at my new favorite Modifier in order to not only Lip Sync but it can be used for a number of other things such as Blinks, Eyebrow Articulation, Hand shapes and more!.

With our character rigged and ready to go we just need to draw some Mouth Shapes. There are plenty of Lip Syncing Mouth Charts available online and I suggest using one of them as a guide. 


 If you want you can download Vlad's Mouth Shapes here.


Once we have our Mouth Shapes we can then use the Timer Offset Modifier. (NOTE: The Timer Offset Modifier is broken in Blender Version 2.92 In the video I am using Version 2.93 I believe the Modifier also works in Some Older Versions of Blender).

This Modifier is really useful, not only for Lip syncing but as I mentioned it's great for other things like Blinks, Expressions and anything else you want to quickly change the pose for.

When it comes to the actual Lip Syncing, you may need to "hold the frame" or extend the mouth position. It will always depend on how fast/slow your character is talking. 

For example, in the Video the character says "Hello". We will first add the H shape and extend it for an additional frame. Then the L shape for two frames and then finally the O shape. The Character Extends the O so I think we can hold the position for three or even four frames. Again this will always depend on the speed of your characters Audio.

If we mess things up and the timing is off? Don't worry!. We can move keyframes around and add new ones really easily. It's not too difficult, maybe just time consuming and depending on how long your animation is, you may be there for a little while. In the Animation I had two characters talking for a couple of Minuets and it didn't really take that long.

So in the end it turns out the Grease Pencil is easier to use than I once thought. I enjoyed making these videos and I hope you guys enjoyed them too. If you did enjoy this series be sure to look out for more Grease Pencil Tutorials!.