05 October, 2020

Blender Python Tutorial: How to Generate a Random Number


In this video, we will be looking at how we can create a random number and then displaying that number in a Panel. We will also take a look at adding text and Icons and only displaying them based on that random number. 

There are two types of Numbers we can use, Floats and Integers. These are just fancy names for Decimal or Whole Numbers. 

After we import bpy, we then need to import random. This will then enable us to generate a random number.

In this example we will be using a Panel, an Operator and a Property Group, though you can use it for a number of different scenarios. I use a template script which was created in a previous tutorial and if you want to follow along, you can download a blank template here.

Alternatively you can download the finished script here.

If you want to Generate a Random Float (decimal) Number we need to create a Custom Property:


If you want an Integer (whole) Number, be sure to change the Property (as shown below):


Now we have created a either a Float or Integer Property,  we want to display that Property on our Main Panel.

In the "draw" section of your Panel we can add the Property like so:


You will notice the "mytool" reference. This reference allows us to use any of the Custom Properties within our Property Group. We have covered this in a previous tutorial. Be sure to watch the video here.

At this point, you will have a simple Panel with a Property called "Random Number". The Idea is, that when the button is pressed, a Random Number will be Generated and then Displayed. To do this we need to go to the "execute" section of our Operator. 

For the Float (decimal number):


For the Integer (whole number): 


To generate a random Float or Integer is very similar.

For the Float: x = random.uniform(0.0, 1)

We first create a reference called "x", though this could be named differently. We then use, "random.uniform" for a Random Float Number. Finally we use an argument "(0.0, 1.0)", this first decimal number is the starting number. Which is then separated by a comma and then we have the end number.

For the Integer: x = random.choice(range(0, 3))

Again we start with a reference (if you already have x as a reference, be sure to use something else). We then use, "random.choice" for a Random Integer Number. The argument for this is different, "(range(0, 3))". The first number is the starting point though the last number will not be shown.

So if you want the Random Integer to be between 0 and 3 we need to change it to (range(0, 4)).

Now when we run the script and press the button a Random Number has just been Generated!. Though you can not see anything you will just have to take my word, or you can print the random number to the system console. 

To do this you simply need to type:

print(x) 

or if you want to get a little fancy, you could add a custom message:

print("The Random Number is: ", x)

So, we now know the Random Number is working!. We can delete that line of code (since the system console is just for debugging or errors). Then we can display the Random Number by updating our Custom IntProperty that we created before.

This is really simple and requires only one line of code. Right under the Reference: 


mytool.random_number = x

This code would be the same no matter if it's an Integer or a Float. We are simply telling the random_number Property to change its Value to x, which is whatever the Random Number is.

We can take this further (as shown in the video), and add text or icons which are displayed depending on the random number.

I hope you find this tutorial helpful and as always thanks for reading.

08 September, 2020

Blender 2.9 for Scripting


In this video, I wanted to let you know that Version 2.9 of Blender is available and I will be using this new version for all future Tutorials. I also wanted to show some of the changes to the Scripting Workspace. 


The Info Window has been slightly redesigned with clear icons and nice spacing, making it much easier to read the lines of code.

Though not all changes are good, with the new version there are some problems with our old scripts. Many of them may not work as they should or at all. 


This could be due to a number of things though if you read your error messages you should be able to quickly diagnose the bug and fix it with ease. In the next video we will be checking out an error message and how we can fix it, so be sure to look out for that!.

Another major change has been to some nodes, from adding new options to switching outputs around. As you can see from this example, the Noise Texture is one of the Nodes that has changed. 


Changing these nodes will certainly break your add-on (if your add-on utilizes nodes), for example in the old version we would use the output 0 but in the new version of blender this would change the effect of our shader. To fix this we just need to check the nodes and change the index number in the correct part of our script.

With the Addition of the Roughness, it forces the Distortion option down thus changing it's index number. That means if you have defined a certain value for the distortion, it will now be applied to the Roughness instead.

Unfortunately there is no error message to display since this is "technically" not a bug. So it's a good idea to go through your scripts and test them. All the functions/operations and settings.

I have also found that some Icons are no longer in use and as you can see from the video it has broken the panel and no longer displays the operator buttons. While this is a simple fix, it's just one example that a minor adjustment can be severe.

I have been trying to find a list of all the changes between the old version and the new but I have had no luck. I will list a post with all the changes I find, if you find anymore you can post a comment below and I will add it to the list.

I hope you find this video helpful and as always, thanks for watching!.


31 August, 2020

Blender Python Tutorial: Property Subtypes (and Password Protection)


In this video, we will be taking a look at some different Subtypes for our Properties. 


Simply by changing the subtype of a property can change how the property is displayed on a panel or dialog box. In the previous video you may have seen how we changed a simple Float Vector Property into a Color (with alpha) input. 


If you want to follow along, you can download the template script here. It's a simple script with a Property Group, an Operator and a Panel. Alternatively, you can download the finished Script here.

Within custom properties we can define many different arguments such as the Name, description and so on. In this example we want to focus one one argument in particular and that is the subype. Using the Python Console we can not only find what arguments we can use but also what subtypes and more. 

You will find that some subtypes are useful for certain situations and depending on what option or value you want to display, the choice will vary.

Thanks to the String Subtype, I also wanted to show you a quick way to password protect your operations or options. You could take it further and add more features to it.

I hope you find this video helpful and as always, thanks for watching!..

17 August, 2020

Blender Python Tutorial: How to add an Enumerator to a Panel & Create a Property Group


In this video, we will be looking at adding an Enumerator and other Custom Properties onto a Panel. We will also be creating a Property Group which will contain a number of custom Properties we can define.

We will need a couple of things before we can get started. We will need a basic script that contains a Panel, operator and a registration section. You can use Blenders Templates to add a panel and operator (though if you want to follow along you can download the starting script here or you can download the Finished Script here).

We can then add our Property Group and fill it full of custom Properties. In this example we will be adding a String (so the user can enter text), a Float (so the user can enter a number value) and we will also be adding an Enumerator (dropdown). 

You can add more (or different) properties to suit your needs. 


 In this example we will be creating a String, Float and Enumerator Property.


After we have created the Custom Properties, we then need to display them on our Panel.


 In order for this to work we need to create a reference called 'mytool'. 


This reference is only possible thanks to the Pointer Property.


We need to register my_tool and define the Property Group that we want to use. We also need to delete the my_tool when it is no longer needed as shown below. 


 Like any other class, we need to add the Class Name to the Classes List.


Though in this case we need to add the MyProperties to the beginning of the list.


10 August, 2020

Blender Python Tutorial: How to Create and Assign a Shader Material


In this video, we will be taking a look at not only creating a Shader Material but also assigning that material to the currently selected object.

We can create something simple or something complex but both ways will be using an Operator. We first create a panel where our button will live. Then we can create a simple operator, that when pressed will create and assign a Shader Material to the Selected Object.

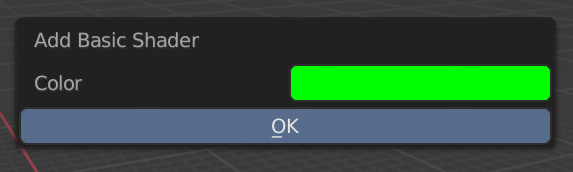
If you want the user to have any options, we can easily upgrade the simple operator and make it become a popup dialog box. We can then giver the user control over any setting or option. In this example we want the user to be able to set the color before adding the Shader.

We have covered popup dialog boxes in other posts and videos so be sure to check them out!. Though in this example we will be taking a look at the FloatVectorProperty.

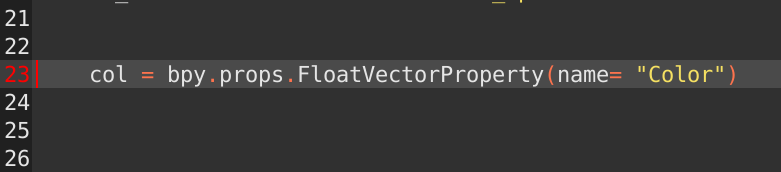
In code that would be:

The Float Vector Property usually looks like this:
If we tried to use this in it's current state, it would kick up an error because as we know to change a Color Value we actually need four values. We need the Red, Green, Blue and Alpha Values.


We can just define the Size and set it to 4 to add another value:

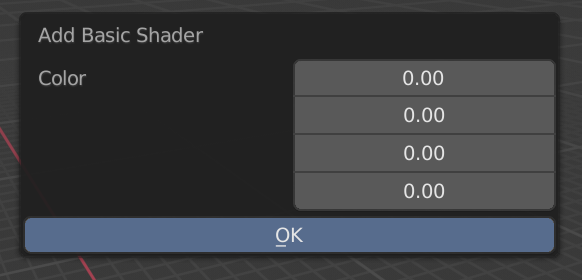
Which would look like this:


Now we have this, it doesn't look great. In fact it looks terrible, we want the user to have a good and quick experience.

So let's change this FloatVector slightly by defining the Sub type.

And that would turn the Float vector into something much more appealing:

If you want to set the default color (here you can see I set the default to green), you just need to define the default like so:

If you want to download the template script you can download the script here.

I hope you found this video helpful and as always thanks for reading!.