25 February, 2021

Blender Add-on: The Shader Library [Version 1.07] - UI and Misc Changes


In this Video, I wanted to share with you the update for the Shader Library Add-on (version 1.07)

The Shader Library is a Free Blender Add-on I have been developing for a little while now. In this Version I had to make some adjustments under the hood and decided to make some additional improvements.

You can find the script here.

Check out the Full list of changes below:

Changes as of version 1.07

  • UI Change for Gold, Silver and Copper Shader. (Roughness Slider has been added).
  • UI Change for Ghost Shader. (Transparency Slider has been added )
  • Variant Option for Ghost Shader. (In Cycles Only, A Variant Option has been added).
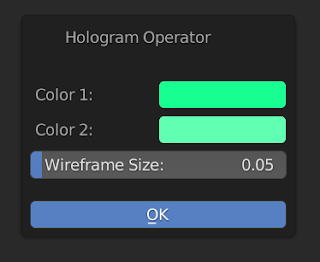
  • UI Change for Hologram Shader. (Wireframe Amount Slider has been added).
  • Diamond Shader Fix (Diamond Shader now works in Eevee Render Engine).
  • Optimized script. (File size now 42KiB).


The Gold Shader Operator

This now has a Slider for the Roughness Value. You can set the Amount of Roughness to your Gold Shader.

(Note, This is the Same for the Silver and Copper Shader also)


The Ghost Shader Operator

This now has a Transparency Slider. At 0 the Shader is 100% Transparent. At 1, the Shader is Visible.


The Ghost Shader Operator (In Cycles)

When using the Ghost Shader in The Cycles Render Engine the Operator will have a "Variant" Option. (This name should be changed to something more applicable).


With this option enabled it will add a subtle effect to the shader and you will be able to see the whole object (see Images below).


Ghost Shader

This is the Ghost Shader by default. We can see through Suzanne and any objects behind her but we do not see her right ear and the other side of the Model.


The Ghost Shader (Variant)

With the Variant Enabled we can now see the whole model and anything behind it. I think the name "Variant" should be changed to something more applicable. (Got an idea what that should be? Let us know in the comments!).

The Hologram Shader Operator

The Wireframe Size Slider has been added. You can set how big or small the wireframe effect is. Though the slider goes up to 1, you can manually enter a value for more Wireframeness?...


 Update 1.08 is now available. Check out the blog post here


18 February, 2021

Why is it not Working? : Particle System and Panels


In this video, we will be doing another "Why is it not working?" thanks to a question I get asked quite frequently. "How can I add other things to my Panel".

We will be adding some Particle System Properties to our Panel. We can easily find out how to do this by checking out the Info Window as we actually change the options manually. Once we know where the options or Properties live we can then reference them in our Panel and bring over as much or as little as we want.

Having your commonly used tools and properties at hand is not only easy to do but is a great way to speed up your workflow.

You can download the Basic Template here, or you can download the finished script here.

I hope you find this video helpful and as always thanks for reading!.

04 February, 2021

Blender Python Tutorial: Application Timers


In this video, we will be taking a quick look at Timers. We will be creating a simple timer that will run a function once after a set amount of time. Then we will create a timer that will run a function once every second for a set amount of times.


This timer is quite simple but effective. If you want to run a Function after (x) amount of seconds this will do the trick.

We first create a Function and call it in_5_seconds. After 5 seconds we want something to happen, such as printing a message to the System Console.
We are not limited to just printing messages, we could add objects, make adjustments or even run other functions.

We can then call the Function as a Timer: bpy.app.timers.register(in_5_seconds, first_interval= 5). We just need to add the Function Name and then set the First Interval.

Since this is a float, we can lower the number to slow it down.


The next Timer we will be taking a look at is one where we can Run a Function once, every (x) amount of seconds for (n) amount of times. With this Timer we can set how many times we want a function to run along with how quick the function is ran between intervals.

We first create a Global Variable called counter. This variable will go up as our Function is ran. Once it hits a defined value it will then stop running the Function.

For this Timer we must make sure we add the If statement. We need to tell the Timer when to stop. By using the Counter we can define the amount of times the Function is ran. When we call this Timer we only need to add the Function Name.

There are other example of Timers and if you want to check out the Official Docs you can click here. If you want to see more Complex Timers be sure to let us know in the comments.

I hope you find this helpful and as always thanks for reading!.